The Complete Guide to Diagnosing and Fixing Dim Headlights
Every driver has encountered that frustrating moment when they notice one headlight appears significantly dimmer than the other. This common automotive issue not only affects visibility and safety but can also lead to unnecessary expenses if not properly diagnosed. Understanding the root causes and systematic troubleshooting approach can save both time and money while ensuring optimal vehicle performance.
Understanding the Problem
Dim headlights typically manifest as one headlight producing noticeably less light output than its counterpart. This issue affects vehicles across all makes and models, from older cars like the 1993 Toyota Tercel to more modern vehicles like the 2005 Ford Focus. The dimming isn’t related to high beam functionality but occurs during normal driving conditions, making it a safety concern that requires immediate attention.
Primary Causes and Systematic Diagnosis
Step 1: Check the Fuses First
Before investing in expensive headlight replacements, the most cost-effective starting point is examining the fuses. Many vehicles have separate fuses for each headlight, typically rated at 10 amps. A failing fuse can cause significant brightness reduction even when not completely blown. Testing involves removing and reinserting the fuse while observing the headlight’s response. If the light brightens noticeably when the fuse is reinserted, this indicates the fuse is the culprit.
Step 2: Inspect Ground Connections and Wiring
Poor electrical connections represent another common cause of dim headlights. Ground wires that aren’t properly connected can significantly reduce electrical flow to the headlight. This diagnostic step involves checking all wire connections to ensure they’re secure and free from corrosion or damage.
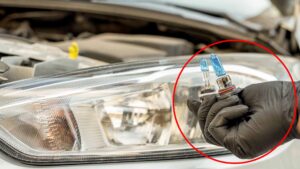
Step 3: Test with Bulb Swapping
To isolate whether the issue lies with the bulb itself or the electrical system, swap the headlight bulbs between the dim and bright sides. If the dimness follows the bulb to the other side, the bulb needs replacement. However, if the same side remains dim regardless of which bulb is installed, the problem lies within the vehicle’s electrical system.
Advanced Troubleshooting: Connector Corrosion
The Hidden Culprit
One of the most overlooked causes of dim headlights is connector corrosion, particularly in vehicles exposed to moisture-rich environments. Areas near large bodies of water or regions with frequent snow create conditions where moisture infiltrates electrical connections. This moisture corrodes the metal contact surfaces, creating resistance that reduces electrical flow and generates heat.
Identifying Corroded Connections
Visual inspection of the electrical connector behind the headlight bulb often reveals the telltale signs of corrosion: discolored, burnt-looking metal contacts and heat-damaged plastic housing. These corroded connections not only cause dimming but can eventually lead to complete headlight failure.
The Professional Repair Solution
When corrosion is severe, cleaning the connections provides only a temporary fix. The proper solution involves replacing the entire pigtail connector, which requires careful attention to safety and proper technique.
Safety First
Always disconnect the negative battery terminal before working on any electrical components. This prevents accidental shorts and potential damage to the vehicle’s electrical system.
Proper Connector Replacement Process
The replacement process involves removing the headlight assembly to access the rear connector. After identifying the corroded pigtail, each wire must be carefully disconnected and reconnected to the new connector. Critical considerations include:
Wire Identification: Since replacement connectors may not have color-coded wires matching the original, proper wire routing becomes essential. Working on one wire at a time prevents confusion and ensures correct connections.
Connection Quality: While crimp connectors might seem convenient, they’re unsuitable for applications exposed to the elements. Soldering provides the most reliable, weather-resistant connection. Each joint should be properly soldered and protected with heat shrink tubing to prevent future corrosion.
Testing Before Final Assembly: Before reassembling everything, reconnect the battery and test the repair. The brightness improvement should be immediately apparent, confirming the repair’s success.
Prevention and Maintenance
Environmental Considerations
Vehicles in coastal areas or regions with harsh winters face accelerated connector corrosion. Regular inspection of electrical connections, particularly those exposed to the elements, can prevent dim headlight issues before they become problematic.
Quality Parts Matter
When replacing connectors, using quality replacement parts ensures longevity. While it might seem unusual to use parts from different manufacturers, compatibility and quality should take precedence over brand matching.
Cost-Effective Approach
The systematic diagnostic approach prevents unnecessary expenses. Starting with the least expensive potential solutions—fuses costing mere dollars—before progressing to more complex repairs saves significant money. Even complete connector replacement, typically costing under twenty dollars in parts, remains far more economical than replacing entire headlight assemblies.
Conclusion
Dim headlights represent a solvable problem with the right diagnostic approach. Whether the issue stems from a simple fuse problem or requires connector replacement due to corrosion, understanding these common causes empowers vehicle owners to address the problem efficiently. The key lies in systematic troubleshooting, starting with the simplest and least expensive solutions before progressing to more complex repairs.
By following this methodical approach, drivers can restore proper headlight function, ensure road safety, and avoid the frustration and expense of misdiagnosed problems. Remember that electrical issues in vehicles often have straightforward solutions when approached with the right knowledge and tools.