How to Install a Reverse Camera in Just Simple Steps
Installing a backup or reverse camera in your car is a great way to avoid accidents while reversing. Whether you’re doing it for safety or convenience, you can easily install it yourself. This guide combines two methods: one for a camera installation with an aftermarket radio and another using a basic reverse camera setup. Here’s how you can do it in simple steps.
What is a vehicle reverse camera?
A vehicle reverse camera, also known as a backup camera, is a safety device installed on cars to help drivers see what’s behind them while reversing. It consists of a small camera mounted at the rear of the vehicle and a screen inside the car that displays the camera’s view. This helps prevent accidents by showing obstacles, people, or other vehicles behind the car. Many reverse cameras come with grid lines on the screen to assist with parking. Some systems also include sensors that alert the driver if something is too close, improving safety when reversing.
Why is a reverse camera essential for a car?
A reverse camera is essential for a car because it improves safety by helping drivers see what’s behind them when reversing. Here are a few reasons why it’s important:
- Prevents Accidents It helps avoid hitting pedestrians, obstacles, or other vehicles while reversing, especially in tight spaces.
- Improves Parking The camera provides a clear view, making it easier to park and maneuver the car in small or crowded areas.
- Reduces Blind Spots It eliminates blind spots, particularly for drivers who may struggle with rear visibility.
- Enhances Driver Confidence With a reverse camera, drivers can reverse more confidently, knowing they have a clear view of their surroundings.
How to Install a Reverse Camera
What do you need to install a rearview camera?
Before you start, make sure you have the following items:
- Backup Camera (e.g., King Yu model)
- Video Cable with Power Lead (usually about 15 feet long)
- Power Cable for the Camera
- T-taps or Crimp Connectors (for wiring)
- Compatible Aftermarket Radio (with reverse camera input)
- Tools: Wire stripper, crimping tool, screwdrivers, electrical tape, soldering iron, and trim removers.
- Electrical Test Light for wiring.
Step 1: Mount the Camera
Mounting the camera is a simple but important task. Here’s how you can do it:
- Find a flat spot above the license plate.
- Clean the area where the camera will be installed using a cleaner.
- Stick the camera on with double-sided tape for a quick install. For more security, use screws if you’re okay with drilling.
- Run the camera wire inside the car, ideally following the path of the license plate light wire.
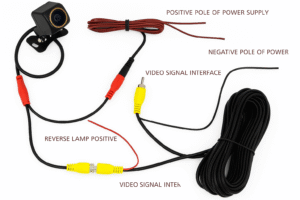
Step 2: Wiring the Camera to the Reverse Light
To power the camera, you need to connect it to the reverse light:
- Find the reverse light wire: Use a test light to locate the correct wire that powers on when you put the car in reverse.
- Solder the camera wire: Strip the reverse light wire and connect it to the red wire from the camera. Use a soldering iron to make a secure connection.
- Ground the camera: If the camera has a black wire, attach it to a metal part of the car to ground it properly.
Step 3: Connect the Camera to the Radio
Now, connect the camera to your car’s aftermarket radio:
- Camera Power: The camera’s power wire (red) should be connected to the reverse light’s power wire or the ignition, depending on how you want it to work (only when in reverse or always on).
- Trigger Wire: The small red wire in the video cable should connect to the reverse light’s positive wire to signal the radio to switch to camera mode when reversing.
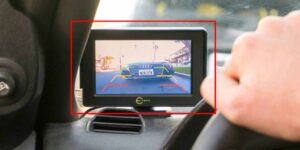
Step 4: Mount the Screen
Now it’s time to install the screen where you’ll view the camera feed:
- Mirror screen: Attach it over your existing rearview mirror.
- Dash or windscreen mount: Use adhesive or suction cups to mount the screen in a place that doesn’t block your view.
Step 5: Wiring the Screen
To power the screen:
- Find an ignition power wire under the dashboard using your test light.
- Connect the screen’s red wire to the ignition power wire, and the black wire to ground (metal part of the car).
- Now, your screen is ready to work!
Final Test
Once everything is installed:
- Turn the ignition on (but keep the engine off).
- Put the car into reverse.
- Your screen should automatically switch to the camera feed.
Additional Tips
- Ensure that your radio supports a reverse camera input.
- Use quality connectors to make sure the system works smoothly for a long time.
- Mount the camera securely before drilling any holes.
Conclusion
Installing a backup camera doesn’t have to be complicated. With a basic understanding of your car’s wiring and a few simple tools, you can add this safety feature yourself. Whether you want a reverse-only setup or always-on functionality, this guide offers flexibility to fit your needs.