How to Fix a Stuck Window on Your Car A Step-by-Step Guide
If you've ever dealt with a car window that won't go up or down properly, you know how frustrating it can be. Whether it's stuck halfway or just refuses to budge, it usually means there's a problem with the window regulator. This part controls the movement of the window and is often what breaks when your window stops working. In this guide, I'll walk you through how to replace the window regulator in a Honda Accord, but the process is similar for most cars. Don’t worry, you can do it yourself and save a trip to the mechanic!
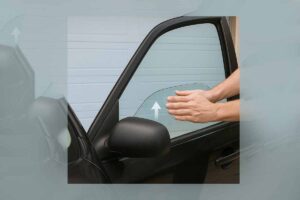
Why Is Your Car Window Stuck?
A stuck window in your car is often caused by a malfunctioning window regulator, which is the mechanism that moves the window up and down. The regulator may fail due to broken cables or worn-out mechanical parts. Another common culprit is a faulty window motor, which powers the movement of the window; if it fails, the window will not move. In some cases, the problem could be as simple as a broken window switch that fails to send the proper signal to the motor. Additionally, physical obstructions, misaligned window tracks, or worn-out window seals can prevent smooth movement. Lastly, electrical issues such as a blown fuse or loose wiring can also be to blame. Identifying the issue typically requires removing the door panel, and if you’re not confident in performing the repair yourself, it’s best to seek professional help.
How to Fix a Stuck Windows
What You Need
Before you start, gather the necessary tools. Here’s a simple list:
- Screwdrivers (flathead and Phillips)
- Plastic trim removal tool (or a flathead screwdriver)
- 8mm or 10mm socket and ratchet
- Replacement window regulator (available at auto parts stores)
Step 1: Remove the Door Panel
The first thing you’ll need to do is take off the door panel to access the window regulator. This is where many people make the mistake of forcing the panel off, causing it to break. Here’s how to do it carefully:
- Look for screws: On most vehicles, there are screws hiding behind little plastic covers on the door. In the case of the Honda Accord, there are screws behind the door handle and a small access plate near the mirror. Make sure you find and remove all the screws.
- Use a trim tool: Once the screws are out, you’ll need to remove the panel from the door frame. Using a plastic trim removal tool is the best way to avoid damaging the panel. Start at the bottom of the panel and gently pry it off. Be sure to start at the bottom because most panels are hung from the top, and pulling from the top could break it.
- Disconnect wiring: Don’t forget to unplug the wiring for the window controls and the door handle. The plastic clips that hold the panel in place can often be reused, so keep those in mind.
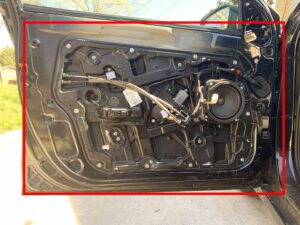
Step 2: Take Off the Weather Shield
Once the panel is removed, you’ll see a plastic weather shield. This part keeps moisture out of the door and helps with noise reduction. Gently pull it off, being careful not to tear it. You may be able to reuse it, but in some cases, it might need to be replaced.
Step 3: Removing the Old Regulator
Now that you have access to the window regulator, it’s time to remove the old one. The window regulator is what moves the window up and down, and it can wear out over time.
- Identify the screws: Look at your new window regulator and compare it to the one in the door. You’ll likely find a few screws that hold the motor and regulator in place. For example, there are three screws for the motor and two for the regulator itself.
- Disconnect the window: Normally, the window is attached to the regulator with two 10mm bolts. Since the window isn’t moving, you won’t be able to line up the bolts to remove them. Instead, you’ll need to loosen some of the screws that hold the regulator and motor in place. This will allow you to shift the regulator and get the window free.
- Remove the window: Once the window is detached, carefully remove it from the door. Be cautious, as the window can be heavy and fragile.
Step 4: Install the New Regulator
Now that the old regulator is out, it’s time to install the new one. Follow these steps to make sure the new regulator is properly installed:
- Attach the new regulator: Position the new regulator into place and align the screws. Be sure to insert the screws loosely at first, just to hold it in place.
- Secure the window: Attach the window to the new regulator by tightening the 10mm bolts that hold the window in place. This is an important step because if the window isn’t properly secured, it won’t move correctly.
- Reconnect the wiring: Don’t forget to plug the motor wiring back in.
Step 5: Clean the Window
Before reinstalling the window, it’s a good idea to clean it. Grease, dirt, and fingerprints can get on the glass during the repair, so take some time to clean the window thoroughly. This will prevent grease from getting into the seals and causing problems later on.
Step 6: Reassemble the Door
Once everything is in place, it’s time to put the door back together:
- Secure the regulator and motor: Tighten all the screws that hold the regulator and motor in place. Don’t forget to tighten the screws fully, but make sure everything is aligned before you do.
- Reinstall the window: Carefully slide the window back into place, making sure the holes in the glass align with the holes in the regulator.
- Reconnect everything: Reconnect the wiring for the window controls, the lock mechanism, and any other components that were unplugged earlier.
Step 7: Test the Window
Before you finish up, make sure everything works. Turn on the car and test the window. If it moves smoothly up and down, you’re good to go!
Conclusion
Replacing a faulty window regulator may sound complicated, but it’s actually a manageable job that you can do yourself with the right tools and a little patience. By following these steps, you can save money on repairs and learn a valuable car repair skill at the same time. Remember, every car is different, but the general process will be similar for most vehicles. If you’re unsure about any part of the process, don’t hesitate to consult your car’s manual or ask a professional for advice. Happy fixing!