How to Adjust Your Car’s Wheel Alignment at Home: A Complete DIY Guide
Is your car pulling to one side or experiencing uneven tire wear? A misaligned vehicle can be frustrating and expensive if left untreated. While professional wheel alignment is always recommended, there are temporary DIY methods to adjust your car's alignment at home that can help you get by until you can visit a repair shop.

This comprehensive guide will walk you through two proven methods for checking and adjusting your vehicle's alignment using simple tools you likely already have at home. These techniques can significantly improve your driving experience and help prevent excessive tire wear.
Why Proper Wheel Alignment Matters
Before diving into the DIY methods, it’s crucial to understand why wheel alignment is so important:
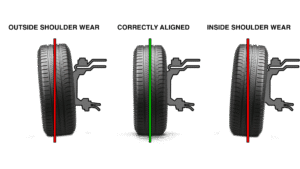
- Tire Longevity: Proper alignment prevents uneven tire wear, extending tire life significantly
- Fuel Efficiency: Misaligned wheels create drag, reducing your vehicle’s fuel economy
- Safety: Poor alignment affects vehicle handling and can compromise road safety
- Driving Comfort: Aligned wheels eliminate the need to constantly correct steering
Signs your vehicle needs alignment include excessive tire wear on one edge, the steering wheel being off-center when driving straight, or the vehicle pulling to one side.
What You’ll Need for DIY Alignment
Essential Tools and Materials:
- Two pieces of cardboard per wheel (for easier tire movement)
- String or wire
- Two step-stools, milk crates, or jack stands
- Tape measure
- 21mm wrench (size may vary by vehicle)
- Pliers
- Marker
- A helper for the second method
Method 1: String Line Alignment Technique
Step 1: Prepare Your Vehicle
Start by ensuring your vehicle is on a flat, level surface. Check that all tire pressures are accurate according to your vehicle’s specifications. Place two pieces of cardboard under each front tire to allow them to swivel more easily during adjustments.
Position your vehicle so the front tires are centered on the cardboard. Turn the steering wheel back and forth to find the center position, then turn off the engine.
Step 2: Set Up the String Lines
Create a reference line using string stretched between two step-stools or similar objects. Position these supports about arm’s distance from each tire – this allows you to easily adjust the string position as needed.
Set the string height to match the center height of your tires. For most vehicles, this will be slightly more than a foot from the ground.
Step 3: Position the String Accurately
Using a tape measure, position the string approximately one inch from the center cap or a common reference point on each wheel. Ensure the string is tight and doesn’t touch any part of the vehicle while remaining as close as possible to the car’s body.
Repeat this setup for both sides of the vehicle, maintaining consistent measurements.
Step 4: Square Up Your Reference Lines
Measure the distance between the two strings at both the front and rear positions. Adjust the strings until these measurements are equal – this ensures your reference lines are parallel and square to the vehicle.
Step 5: Take Initial Measurements
Measure the distance from the string to the back edge of the rim, then measure from the string to the front edge of the rim. Record these measurements for both wheels.
For proper alignment, the front of the tire should be about 1/16 inch closer to the string than the back of the tire (toe-in). If measurements show excessive toe-in or toe-out, adjustment is needed.
Step 6: Make Tie Rod Adjustments
To access the tie rods, turn the steering wheel fully to one side. Locate the tie rod end and mark its current position with a marker before making any adjustments.
Loosen the lock nut using the appropriate wrench (typically 21mm). To adjust toe-in, turn the tie rod using pliers. Start with quarter-turns and recheck measurements. For excessive toe-in, you’ll need to lengthen the tie rod; for toe-out, shorten it.
After each adjustment, tighten the lock nut snugly (you can fine-tune later) and return the steering wheel to center. Shake the wheel to ensure it’s properly centered.
Step 7: Verify Your Adjustments
Remeasure the distances from string to wheel edges. Continue making small adjustments until you achieve the desired toe-in of approximately 1/16 inch. This may require several iterations to get right.
Method 2: Tape Measure Method
This alternative method requires a helper but can be quicker for basic alignment checks.
Setup Process
Position your vehicle on level ground with the steering wheel centered. Have your helper position themselves on one side of the vehicle while you work from the other side.
Taking Measurements
Select a reference line or groove on the tire tread near the center of the tire. Your helper will hold one end of the tape measure at this reference point while you measure from the corresponding point on the opposite tire.
First, measure across the back edges of both tires, ensuring the tape measure remains straight and doesn’t bow. Record this measurement.
Next, measure across the front edges of the tires using the same reference points. The difference between these measurements indicates your vehicle’s toe alignment.
Interpreting Results
A difference of about 1/16 inch (with the front measurement being smaller) indicates proper toe-in. Larger differences require adjustment using the tie rod method described above.
Important Safety Considerations
While these DIY methods can significantly improve your alignment, remember these crucial points:
- These are temporary solutions – professional alignment is still necessary
- Always work on level ground with proper safety precautions
- Make small adjustments incrementally to avoid overcorrection
- Have your work verified by a professional alignment shop
- Some alignment issues require specialized equipment and cannot be corrected with DIY methods
When to Seek Professional Help
Consider professional alignment services if you experience:
- Camber or caster issues (wheel tilt problems)
- Suspension component damage
- Steering wheel vibration at highway speeds
- Continued pulling after DIY adjustments
- Recent accident or suspension work
Testing Your Results
After completing your DIY alignment, take the vehicle for a test drive on a straight, level road. The steering wheel should remain centered when driving straight, and the vehicle shouldn’t pull to either side.
Monitor tire wear patterns over the following weeks. If excessive wear continues, professional alignment may be necessary to address issues beyond basic toe adjustment.
Conclusion
Learning how to adjust your car’s alignment at home can be a valuable skill for any car owner. These DIY methods can provide temporary relief from alignment issues and help prevent excessive tire wear while you arrange for professional service.
Remember that while these techniques can significantly improve your vehicle’s alignment, they’re not a permanent replacement for professional wheel alignment services. Use these methods to get by temporarily, but schedule professional alignment to ensure optimal vehicle performance and safety.
With practice, you can master these techniques and potentially save money while maintaining better control over your vehicle’s handling and tire wear. Always prioritize safety and don’t hesitate to seek professional help when needed.