How to Restore Yellow Headlights Permanently: A Step-by-Step DIY Guide
Over time, your car’s headlights can become yellowed, cloudy, or dull. Not only does this affect the appearance of your vehicle, but it also reduces nighttime visibility and compromises safety. The good news? You don’t need to buy expensive new headlights. With a few tools and materials, you can restore yellowing headlights at home with professional-level results.

This article breaks down the entire DIY headlight restoration process into three easy steps, plus we’ll go over the best options to protect your headlights and keep them crystal clear for years.
Why Do Headlights Turn Yellow? Causes, Effects, and How to Prevent It
Headlights turn yellow over time mainly due to exposure to sunlight, which causes the plastic to oxidize. Most modern headlights are made from polycarbonate plastic, which is strong but sensitive to UV rays. When the protective coating on the headlight wears off, sunlight, heat, and oxygen react with the plastic, making it appear yellow or cloudy. Road dirt, dust, and chemicals from car washes can also wear down the surface, making the problem worse. As a result, the headlights not only look old but also become dimmer, reducing visibility at night.
Step 1: Clean the Headlight Surface
Before you begin the restoration, you need a clean surface to work with.
What You Need
- Microfiber towel
- Mild soap and water
Instructions
- Use a microfiber towel to wipe off any dirt, dust, or grime from the headlight and surrounding areas.
- Dry the lens completely before moving on to the next step.
Step 2: Sand and Polish the Headlight
This is the most important step. The goal is to remove the yellowed layer and restore clarity by using abrasives.
What You Need
- Sandpaper (600, 1500, and 3000 grit)
- Backing pad (foam or drill attachment)
- Cutting compound, car polish, or metal polish
- Masking tape
- Spray bottle with water
Instructions
Mask the Surroundings
Apply masking tape to body panels around the headlight to avoid damaging your car’s paint while sanding.
Start Wet Sanding
- Spray water on both the lens and sandpaper.
- Begin with 600 grit sandpaper using horizontal strokes. Apply light to medium pressure.
- When the water runs milky, wipe the lens — the yellow layer should be gone.
Use Finer Grits
- Switch to 1500 grit, now using vertical strokes to remove previous sanding marks.
- Finish with 3000 grit, again sanding horizontally. This step refines the surface to a smooth haze.
Polish It
- Use a cutting compound and a wool or foam pad (preferably with a drill).
- Buff the headlight in overlapping horizontal and vertical motions.
- For a factory-like mirror finish, apply polish with a foam pad. This is optional, but highly recommended.
Step 3: Apply a Protective Coating
Restoration is only half the battle. Without a protective layer, your headlights will yellow again in no time. Here are your top five options:
UV Hard-Coat (Factory Style)
- Long-lasting (up to 5 years)
- Requires a spray gun, compressor, and UV heat lamp
- Not cost-effective for home use
Aftermarket Headlight Coatings
- Comes in convenient spray cans
- Easy to apply: spray 1-2 coats
- Lasts about 1 year
Clear Coat Sprays
- Commonly available in hardware stores
- Not recommended due to light refraction and peeling issues
- Can reduce headlight brightness
Headlight Covers
- Protects against UV and rock chips
- Leaves gaps around edges that often yellow
- Aesthetically unappealing to some users
Headlight Protection Film (Best Option)
- Lasts up to 5 years
- Doesn’t affect light clarity or refraction
- Easily removable and replaceable
Installation Tips
- Clean the lens and your hands thoroughly
- Spray soapy water on the lens and film
- Apply the film from the center outward
- Use heat (heat gun or hairdryer) to mold the film around curves
- Squeegee out water and trim excess with a razor blade
Basic Steps to Prevent Headlights from Turning Yellow and Keep Them Clear
To prevent headlights from turning yellow, start by regularly cleaning the lenses with mild soap and water to remove dirt and grime. Apply a UV-protective sealant or clear coat after cleaning to shield the plastic from sun damage. Avoid harsh chemicals and abrasive materials that can scratch or wear down the protective layer. Whenever possible, park your vehicle in shaded areas or garages to reduce exposure to UV rays. Additionally, consider using headlight protection films, which act as a barrier against UV light and physical damage. Following these simple steps can help keep your headlights clear and bright for longer.
Bonus Tip: Quick Fix for Light Yellowing
If your headlights are only slightly yellowed, you can skip the sanding and use just a compound or plastic polish. Buff it in using a drill or by hand, then clean the surface with isopropyl alcohol and apply a protective coating.
Conclusion
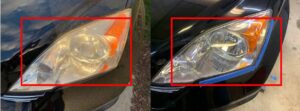
After following these steps, your headlights should look as good as new — crystal clear, shiny, and fully protected. Whether you’re prepping for resale or simply want better night visibility, restoring your headlights is one of the most cost-effective DIY car upgrades you can do at home.